A step-by-step demonstration of how to calibrate a Millar Pressure Catheter using a Delta-Cal Electronic Pressure Simulator.
Equipment required
- Millar Pressure Catheter
- Catheter Interface Cable
- Hemostatic Valve (e.g. Tuohy Borst Adapter)
- Syringe + Warm Saline
- Delta-Cal Electronic Pressure Simulator
- Bridge Amp
- PowerLab
- Computer with LabChart Software installed
Procedure
Equipment set-up
Before recording any signals, it’s important to set up your data acquisition equipment correctly.
- First, connect the Catheter to the Bridge Amp using the Catheter Interface Cable.
- Connect the Bridge Amp to the PowerLab.
- Lastly, connect the PowerLab to your computer and open LabChart.
Presoak Catheter Tip
Fill hemostatic valve with saline
Next, the hemostatic valve needs to be filled with warm saline. To do this:
- Fill a syringe with warm saline.
- Twist open the valve.
- Remove the red cap on top of the valve and connect the saline-filled syringe.
- Block off the remaining end that has the connector attachment with your finger and slowly start to introduce the saline.
- Once full, close off the valve. Remove the syringe and screw on the red cap.
- Lastly, attach the Delta-Cal Pressure Simulator to the connector end of the hemostatic valve. Make sure it’s a tight fit.
Insert Catheter into hemostatic valve
- Once again, open up the valve. Make sure it is completely open.
- Carefully insert the pre-soaked catheter inside the valve, into the saline.
- Close off the valve to create a seal around the catheter. Make sure you don’t screw it too tight, or you can damage the catheter.
Zero the transducer
- Remove the red cap from the hemostatic valve so it’s open to the atmospheric pressure.
- In LabChart, click on the channel that the Bridge Amp is connected to and select ‘Bridge Amp’ from the drop-down menu.
In the Bridge Amp Dialog make sure that the range is sufficient for the pressures you are recording. In this case, 10mV will be fine.

Tip: Care must be taken when determining an appropriate range for your pressure transducer. If the range is too large, the resolution will be poor and small fluctuations will not be seen. Conversely, if the range is too small, the signal will go out of range and you will lose data. Millar Catheters have an excitation of 5V, resulting in an output of ~ 2.5 mV/100 mmHg.
- Next, zero the transducer by clicking ‘Zero’. This will take a couple of seconds, make sure that the transducer is not moved during this period.
- Once that is done, click ‘OK’.
Calibrate the transducer
Next, we are going to do a two-point calibration using the Delta-Cal Pressure Simulator.
- First, place the red cap back on to seal off the system.
- Start the recording in LabChart by clicking the ‘Start’ button.
- Slowly increase the pressure on the Delta-Cal to 50 mmHg. Once reached, type 50 into the comments field in LabChart and hit enter to mark this section of the recording.
- Next, increase the pressure to 150 mmHg. Again, place a comment on the recording once 150 mmHg has been reached.
- Click ‘Stop’ to stop the recording.
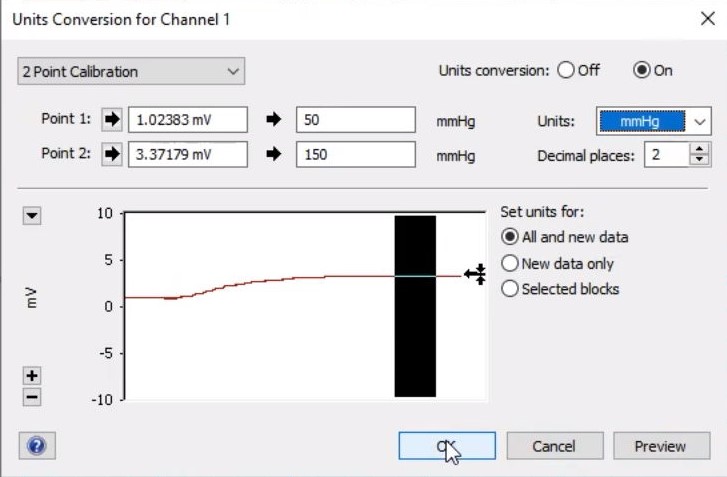
Units Conversion
- Make a selection of the recording between the two comments by clicking and dragging the mouse across the recording.
- Click on the Channel name and go to ‘Units Conversion'. The Units Conversion Dialog will display the recording that was selected (see image below).
- Select an area of the recording that represents the first pressure reading of 50 mmHg in the preview window.
- Then click the arrow next to Point 1 and the voltage for that pressure will be entered into the left-hand box.
- Next, type in the pressure value this selection represents in the right-hand box (in this case, 50).
- Repeat the above steps for the second pressure recording of 150, for Point 2.
- Make sure the units are set as mmHg, then click ‘OK’.
- You now have a calibrated catheter!
Additional Resources:
How to calibrate a Millar Catheter using a Pressure Gauge Kit »
Troubleshooting your Millar Catheter: Three common problems and how to fix them »
Best Practice Tips for maximizing the life of your Millar Catheter »
Surgical Instruction Videos:
Left Ventricular Pressure via Carotid in Rat »
Left Ventricular Pressure via Carotid in Mouse »
Best Practices for Surgical Procedures with Millar Catheters »