Teach your students a lesson they'll never forget with the Muscle Twitch Response experiment. Engage your students and improve their understanding of how nerve stimulation controls muscle contraction in this memorable active learning experiment that has students perform nerve stimulation on themselves...
Experimental Protocol
Students engage in hands-on learning by applying electrodes to their own body and electrically stimulating the nerves in their forearm to demonstrate muscle recruitment.
Using PowerLab 26T
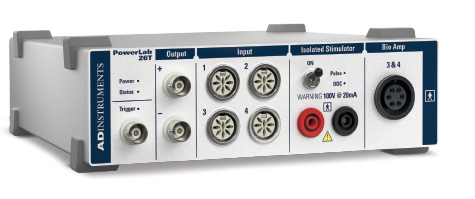
Here are the steps for setting up and running this classic experiment...
- Step 1: Identify learning objectives
- Step 2: Set up your equipment to record signals
- Step 3: Nerve stimulation
- Step 4: Electrode placement
- Step 5: Perform twitch response and recruitment
- Step 6: Analysis
Step 1: Identify learning objectives
By the end of the activity students should be able to:
- Describe and demonstrate the effects of electrical stimuli of the nerves of the forearm.
- Record and measure the muscle twitch response to nerve stimulation, and show recruitment in the twitch response as the stimulus strength increases.
Step 2: Set up your equipment to record signals
Hardware used: PowerLab 26T
Software used: Lt: Life Science teaching software / LabChart
PowerLab setup
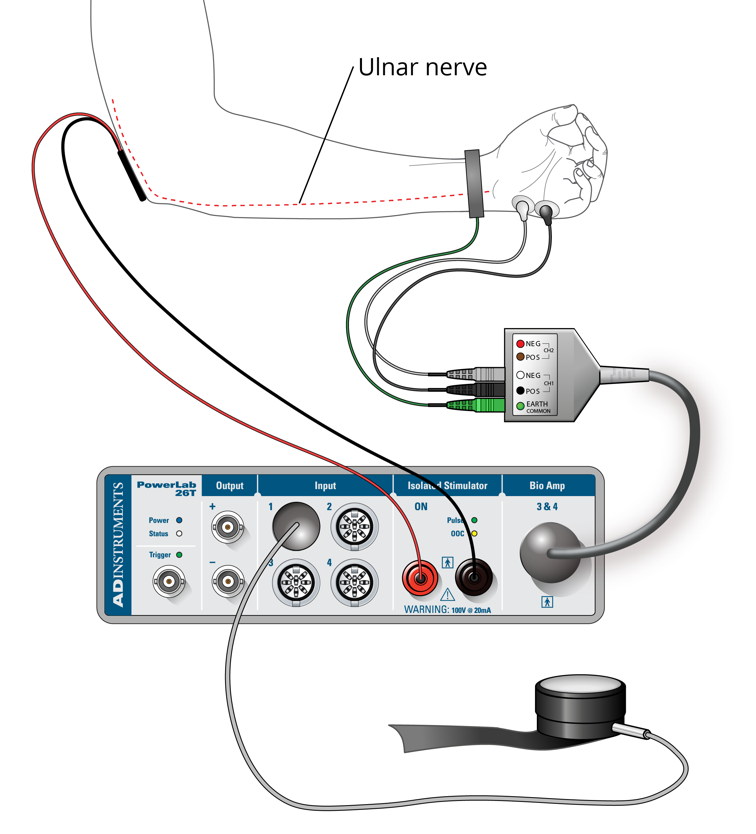
- Plug the Bio Amp cable into the Bio Amp input on the PowerLab.
- Connect the electrode cables to earth, CH1 NEG, and CH1 POS on the Bio Amp cable.
- Connect the earth cable to the dry earth strap. Note, the dry earth strap can be replaced with a disposable electrode if necessary.
- Connect the stimulating bar electrode to the Isolated Stimulator output of the PowerLab:
- Connect the red (positive) connector to the red output.
- Connect the black (negative) connector to the black output.
- Make sure the PowerLab is connected and turned on.
- Connect the pulse transducer to Input 1 on the PowerLab.
- Place the pulse transducer diaphragm-side up on the top of the lab bench, and tape the transducer in place.
See how to engage your students using real-life data acquisition
Step 3: Nerve Stimulation
In this part of the activity, no recordings are made; this is purely to allow students to find the best position to place the stimulating bar electrode for the upcoming experiment.
For students, the questions here are:
- Where do I need to position the stimulating bar electrode to get the best twitches?
- What happens when the nerve supplying a muscle is stimulated?

For effective stimulation to occur, the two pads of the stimulating bar electrode should be aligned along the arm's length. If the stimulus status light changes in color from green to yellow, you will need to put more electrode paste on the pads.
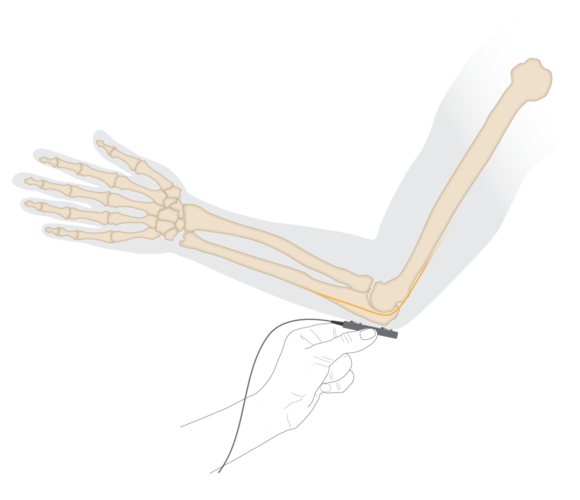
Electrode placement for ulnar nerve stimulation at the elbow.
Procedure
- Place a small amount of electrode paste on the 2 metal pads of the stimulating bar electrode.
- Place the stimulating bar electrode over the volunteer's ulnar nerve at the elbow. The approximate position is shown in the diagram, above.
- Apply pressure to the stimulating bar electrode to ensure the electrode does not move.
- Set the current to 8 milliamperes (mA) in the Isolated Stimulator panel (if using a PowerLab).
- On a PowerLab, the Isolated Stimulator switch should be set to the ON position. The Isolated Stimulator only becomes active during a recording. It is switched off internally at all other times.
- Select Start, and a short pulse current will pass through the volunteer's skin every second. Refer to these if the light flashes yellow.
- If you cannot achieve a response, increase the stimulator current by 2 mA or reposition the stimulus electrode.
- Take note of the twitch contractions affecting the little finger and other fingers. Examine the effect of small adjustments in the position of the electrodes, and locate the position which produces the largest twitches.
- When a good response is achieved select Stop on the device.
- With a ballpoint pen, lightly mark two small crosses on the skin indicating the position of the electrode that produces the most effective stimulation.
- Use these marks to reposition the stimulating bar electrode at the elbow for EMG recordings in the following activities.

In preparation for the conduction velocity activity, repeat the above steps, but this time at the wrist. It is harder to elicit twitches when stimulating at the wrist. Students will need to apply greater currents and more pressure to the stimulating bar electrode.
Step 4: Electrode placement

In these activities, students will stimulate the ulnar nerve at the elbow or wrist, and record muscle activity (compound muscle action potential) and abductor digiti minimi.
Correct electrode placement
- Remove any jewelry from the volunteer's wrists.
- Wrap the dry earth strap around the volunteer's wrist. Note, this can be replaced with a disposable electrode. Ensure that you leave enough space to place the stimulating bar electrode at the wrist.
- Mark 2 small crosses on the skin over the abductor digiti minimi muscle where the recording electrodes will be placed, as shown in the figure. The crosses should be 3–4 cm apart.
- Lightly abrade the marked skin to reduce its electrical resistance. Clean off any residue.
- Obtain 2 new disposable electrodes. The adhesive pads may need to be trimmed slightly so they will fit on smaller hands.
- Snap the cables from CH1 on the Bio Amp cable onto the electrodes.
- Place the electrodes on the skin over the crosses so they adhere well. To reduce electrode movement, use adhesive tape to attach the cables to the skin close to the electrode.
- Place a small amount of electrode paste on the 2 metal pads of the stimulating bar electrode.
- Place the stimulating bar electrode over the volunteer's ulnar nerve at the elbow (using the marks you made previously).
- Ask the volunteer to position his or her arm in a relaxed position on a table so that the little finger rests lightly on the pulse transducer. The forearm should be resting on the table with the elbow hanging over the edge to allow access to the ulnar nerve.

Tip: The red dot on the back of the stimulating bar electrode indicates the positive electrode. Position the electrode so that the positive electrode is closer to the shoulder.
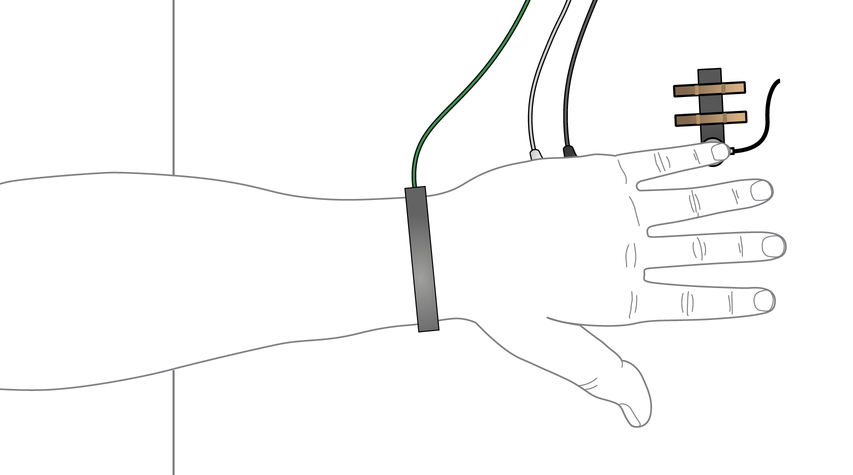
View of hand resting on pulse transducer as seen from above.
The set up should look like this:
Step 5: Perform twitch response and recruitment

In this part of the activity, the question for students is: "What happens when the electrical stimulus to a nerve supplying a muscle is progressively increased?"
Students will investigate how nerve stimulation controls muscle contraction. A muscle twitch is a single contraction in response to a brief threshold stimulation.
Using a PowerLab? When Start is selected to begin recording (as below), the PowerLab will stimulate and then record for 200 ms (0.2 s).
Procedure
- Ask the volunteer to firmly hold the stimulating bar electrode in place with his or her free hand at the elbow, to stimulate the ulnar nerve.
- Ensure that the stimulus current is set to 4 mA and the Isolated Stimulator is turned on. Select Start.
- Increase the stimulus current by 1 mA and select Start.
- Continue to increase the stimulus current in 1 mA steps, selecting Start each time. For most volunteers, the threshold stimulus at which a twitch response is first seen is in the range 5–15 mA.
- When students first see a response, add a comment into your recording noting the stimulus current used.
- Continue increasing the stimulus current and selecting Start until you reach the maximum, which is 20 mA. Select Auto Scale on your analysis software if required.
Observations:
Now that the students have observed a muscle twitch, can they explain what they are seeing in terms of EMG and Force?
Step 6: Analysis
This is a chance for students to examine and analyze their muscle twitch recruitment recordings. Check students’ understanding by asking questions such as:
Question: What happened to the muscle contraction response as the current stimulus increased from 0 mA? What was the smallest current required to produce each of the following?:
- a contraction (threshold current)
- the maximum contraction (or “maximal stimulus” - the current at which the response no longer increases)
Answer:
The answer depends upon the students’ own data. There can be no measurable response at 0 mA. Usually the first twitch begins around 4–6 mA, and the maximum contraction force begins around the 12–15 mA range.
Question: When the current reached the following stages, what proportion of fibers in the muscle were contracting?:
- at threshold
- at the maximal stimulus
- above the maximal stimulus
Answer:
Again, the answer depends upon the students’ own data:
At 0 mA no muscle fibers are contracting.
- At threshold just a few muscle fibers are being recruited.
- By definition, the maximal stimulus is seen when 100% of recruitable fibers are contracting.
- Above maximal stimulus, the number of contracting fibers cannot increase.
Question: Why does varying the stimulus strength affect the twitch force?
Answer:
With stronger stimuli, more nerve fibers are stimulated and therefore more motor units are recruited.
This experiment is part of the wider Skeletal Muscle Function Lab, available in Lt. The full lab continues to examine summation, tetanus, and conduction velocity in an interactive and immersive way.
Lt is our online learning platform that saves educators time and engages students by combining hands-on data acquisition using PowerLab with ready-made labs and lessons for teaching life science. Find out more…
Note: These activities involve the application of electrical currents to muscle through electrodes placed on the skin. People who have cardiac pacemakers, or who suffer from neurological or cardiac disorders should not volunteer for these activities.
Muscle contraction and sensations (such as tingling or brief discomfort) can be associated with nerve stimulation. If the volunteer feels major discomfort during the activities, discontinue the exercise immediately.
Teach your students a lesson they’ll never forget with the all-new T Series PowerLab.
The T Series PowerLab is a high-quality, durable data recorder designed specifically for teaching. Make science fun with our plug 'n' play solution that connects to a wide range of transducers and user-friendly software. We even have over 900 pre-written labs and lessons that students will love and that save you time and effort!


