Left Ventricular Pressure via Carotid in Rat
Instructions for carotid artery catheterization using a Millar 2-French catheter
for left ventricular pressure measurement in rats.
Surgery performed at the René Remie Surgical Skills Centre by Prof. René Remie. Animal handling and surgical procedures all strictly follow Dutch Legislation on Laboratory Animals and was approved by the IACUC.
Hardware:
- ADInstruments PowerLab 16/35 for data acquisition
- Animal BioAmp for ECG measurement
- Bridge Amp for Pressure measurement
Catheter:
- The Millar SPR-320 catheter is connected to the Bridge Amp
Software used to record and analyze the pressure signal:
Anaesthetic:
The rat was anaesthetised using injectable anaesthetics and analgesics.
Procedure:
Make a simple catheter introducer
Before you begin the surgery, you can follow our step by step video instructions for making a simple catheter introducer from a 23 gauge syringe needle.
- With the bevel of the needle facing upwards, bend the tip almost 90degrees using a needle holder.
- You can also bend the needle a little to one side to prevent your fingers from being in the field of view when performing the catheterization.
- Attach the needle onto a syringe to create a simple catheter introducer.
Procedure begins: Incision
- Make an incision from the level of the ears to just above the sternum.
- Holding the tissue in the rostral direction, first make a small incision, and then using the tissue holder and scissors, make an incision along the neck.
- Next, open up between the two submandibular glands using a combination of sharp and blunt dissection.
- Maneuver between the two glands, spreading them using blunt dissection, until the sternohyoid muscle comes into view.
Find the carotid artery
There will now be several recognizable structures visible:
- The submandibular gland.
- The sternohyoid muscle, going from the sternum to the hyoid bone.
- The sternomastoid muscle, going from the sternum to the mastoid.
- The digastric muscle, a muscle found between the previous two muscles.
The 3 muscles - sternohyoid, sternomastoid, and digastric - form a triangle.
Inside this triangle, you will find the carotid artery.
[columns_wrap] [card]
There are two common approaches to the carotid artery:
- Between the sternohyoid and sternomastoid muscles:
One approach is to enter between the sternohyoid and the sternomastoid muscles. By separating these two muscles, the carotid artery will be revealed. - Preferred option: through the sternohyoid muscle:
The preferred option is to go through the sternohyoid muscle. This method will give you more access to the carotid artery, which will be useful in the catheterization.
[/card] [/columns_wrap]
Separate the vagus nerve from the carotid artery
- Once you have identified the carotid artery, you can hold back the tissue using simple hooks. With the tissue out of the way, you can clearly see the carotid artery (smaller vein), as well as the vagus nerve.
- Be careful not to damage the nerve as this could have consequences on heart rate and make it erratic.
- Very gently free the vessel from its surrounding tissue.
- Generally, the vein will be detached from the artery. However, the artery and nerve are surrounded by a vascular sheath, so the sheath needs to be opened.
- To open the sheath, it helps to place forceps under the vessel. Then, with the other forceps, gently push between the nerve and the vessel.
- Once through the sheath, you can use one of the legs of the forceps to further open the sheath and then with the other forceps, go under the vessel.
- Make sure that the nerve is free from the vessel, otherwise there is the risk that you will tie the nerve together with the vessel in the ligature.
Ligature
First, place the obstructive ligature.
- Normally this procedure only requires two ligatures. However, if you are new to this procedure, it’s advisable to place an extra safety ligature (demonstrated later in procedure).
- Bring the ligature as far rostrally as possible, making sure that the vagus nerve is not in the ligature.
- Complete the knot to tie off the artery and hold it under tension using artery forceps, also known as Micro-Halstead forceps.
Next place the second ligature.
- For this ligature you will not tie off the knot, but only place the first half of the knot and then stick the free ends of the suture to the wall of the muscle to keep them out of the way.
Now for safety, place a third ligature.
- This is a good idea when new to this technique.
- This will be useful in case you have leakage.
Next, place the clamp.
- To facilitate this you can lift the vessel by pulling on the second ligature.
- This will lift the artery and allow you to place the clamp as far caudally as possible. This will maximize the available length of the artery for catheterization.
- Make sure all suture ends are above the clamp for easy access.
Insert the catheter
- The vessel will now be catheterized at the rostral end of the exposed artery. You can use the catheter introducer you made at the start of the procedure.
- The catheter will then be advanced all the way to the clamp, after which you will tie off one of the ligatures.

Tip: It’s a good idea, once you’ve isolated the vessel, to regularly moisten it with some warm saline, to prevent it from drying out.
- For this procedure, use tubing inducing forceps, which fit nicely around the catheter. Alternatively, you can use forceps with the ends covered in silicone tubing.
- Next, puncture the vessel using the needle, and then place the catheter under the needle and advance it into the vessel, all the way to the clamp.
- You can now tie off the vessel around the catheter. Be sure not to over tighten it, just tie enough to close off the vessel.
- With one hand holding the catheter, use your other hand to slowly remove the clamp, checking for any leaks.
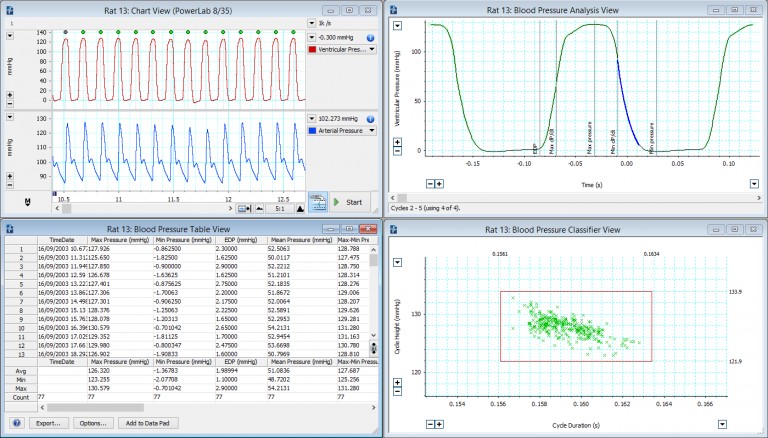
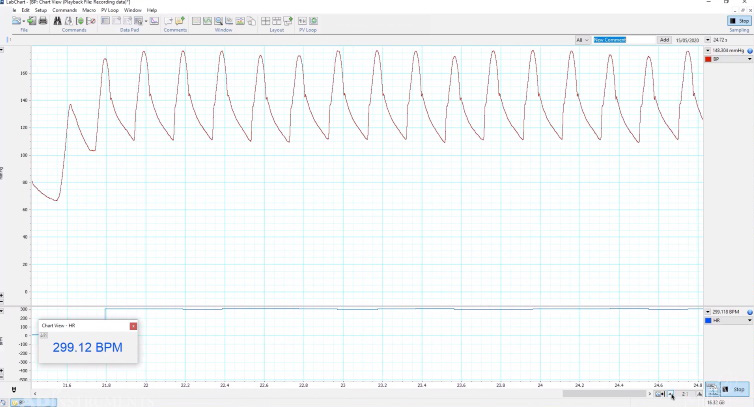
Should it leak, just let go of the clamp and determine where the leak is. Otherwise, advance the catheter towards the heart using the tubing inducing forceps, or forceps with silicon tubing covered ends. - With the catheter in the artery, you can see the signal in LabChart (or your own software) where the dicrotic notch is clearly visible:
- As you advance the catheter it will eventually reach the heart. When it reaches the aortic valve, the catheter and vessel will move quite vigorously. If the catheter doesn’t enter the ventricle easily, it sometimes helps to move the animal slightly to the right, so that the catheter lines up better with the ventricle.
Tip: Keep the vessel moist,
this helps in advancing the catheter.
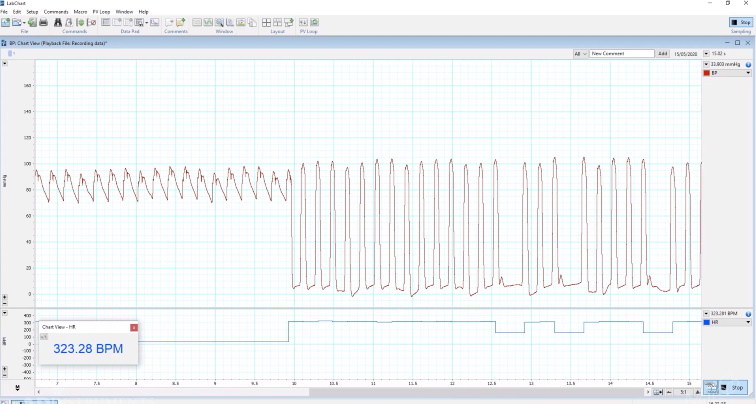
- When you advance the catheter past the aortic valve, notice that the pronounced movement of the catheter is reduced.
- Looking at the LabChart trace (below) you can see the signal changes from systemic pressure into ventricular pressure between just above zero, and in this case 100mmHg. This means you are in the ventricle.
- Finally, you can release the tension on the artery forceps and cut away the free strands of the sutures.
Tips:
- When doing a long term recording, it’s a good idea to tie off the extra ligature in case the second ligature has moved, or the vessel has been damaged due to the movement of the catheter.
- Use the obstruction ligature ends to tie off the catheter with another knot, so as to hold the catheter securely in place. In doing so, the catheter is held in 3 places and this will prevent it from moving.
- Try not to make your sutures longer than 4cm as it will make it difficult to find the suture ends under a microscope.
Completion of procedure
To finish off the procedure, release the hooks and place a piece of gauze that has been moistened with sterile saline on top. This way you can record for some time, depending on the anesthetic used.
We hope you found these surgical instructions useful.
Please visit our comprehensive Invasive Bood Pressure Application page for specialized information and useful resources relating to invasive blood pressure applications and research.
If you have any questions, please contact your ADInstruments support representative who will be happy to provide specific information and assistance with your research requirements.
Return to Surgical Instruction Video Series Main Page »
Additional resources
- Optimizing your Blood Pressure and Pressure-Volume Recordings »
- Cardiovascular Assessment of Pressure-Volume and Blood Pressure »
- Invasive Blood Pressure - fundamentals and best practices for preclinical research »
- Troubleshooting your Millar Catheter: Three common problems and how to fix them »
Find out more about Invasive Blood Pressure recording and analysis:
Everything you need for invasive blood pressure recording and analysis, in one place »