Learn how to be intentionally inclusive when teaching reproductive physiology.
Our recently-released Reproductive Physiology module has been deliberately designed to include gender-inclusive terminology. In this webinar, instructional designer, Vicky, discusses our journey towards using more gender-inclusive terms, and also shares some key resources that you may find useful in your own teaching.
What's in the reproductive module?
The reproductive module contains two labs, two pre-lab preps, and three shorter lessons detailing the reproductive system:
- Ovo-uterine Reproductive Physiology - Lab
- Testicular Reproductive Physiology - Lab
- Ovo-uterine Reproductive Physiology - Pre-Lab Prep
- Testicular Reproductive Physiology - Pre-Lab Prep
- Reproductive Anatomy
- Reproductive Physiology
- Menstrual Cycle
The learning objectives and information included in this module align with the Human Anatomy and Physiology Society (HAPS) learning outcomes for reproductive physiology (N1–4) that were released this month. These learning outcomes ensure students explore an overview of the reproductive systems, learn more about the specifics of ovo-uterine and testicular reproductive systems, and understand how age affects reproductive system function.
You can find the new labs, lessons, and tutorials on Reproductive Physiology now in our Lt Human Physiology Collection.
Incorporating inclusive language
The American Psychological Association recommends that authors should "use language that is free of bias and avoid perpetuating prejudicial beliefs or demeaning attitudes in their writing".
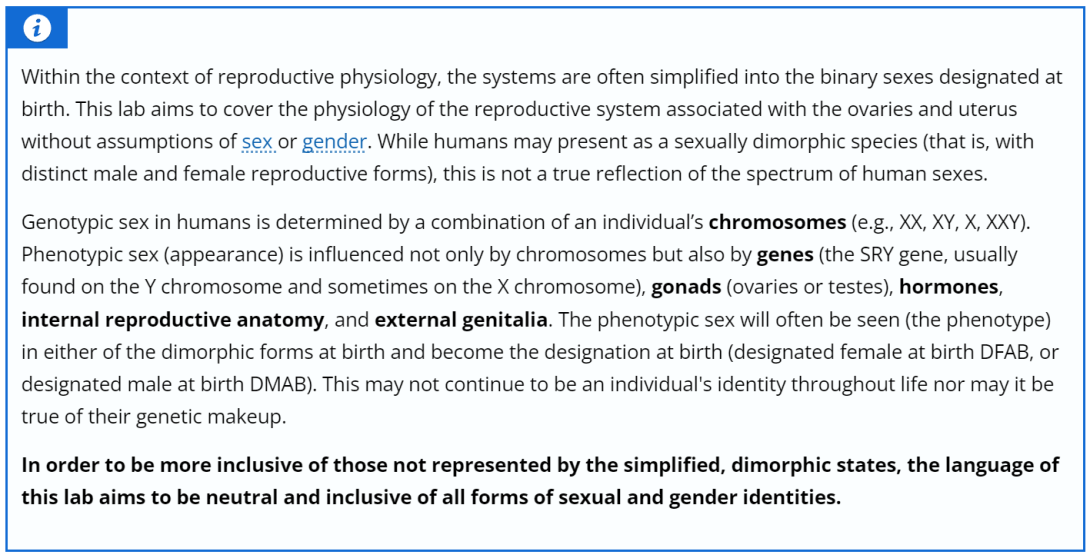
To clearly explain our language choices, each lesson within the reproductive module opens with a paragraph on the language we chose to use. Reproductive systems are often simplified into dimorphic states (male and female); however, sex and gender are not binary, and so we use the inclusive physiology terms “ovo-uterine” and “testicular” to refer to the reproductive systems instead.
We also made a conscious effort to not use gendered terms in order to provide more inclusive teaching while still providing a full learning experience. It was thanks to work shared by Dr Valerie O’Loughlin, Director of Undergraduate Medical Education at Indiana University Medical School, that we were able to make the necessary changes.

Each lesson opens with a paragraph detailing the inclusive language choices.
By explicitly explaining our reasoning for using these terms, students are able to understand the distinction between gender and sex, and the need for sensitivity when discussing these topics.
What are the negative impacts of not using inclusive language?
- Negatively impacts the mental health of marginalized people
- Contributes to poor healthcare for LGBTQ+ community members
- Increased stress on minority groups through microaggressions and subtle discrimination
What are the positives of using inclusive language?
- Promotes a non-judgemental atmosphere
- Focuses on facts
- Affirms individuals' identities
- Enhances empathy within the community
Top tips for making your teaching more inclusive
- Ask yourself challenging questions when teaching - is is necessary to gender the person you are describing? Are you seeking places to appropriately add in diversity?
- Differentiate between sex and gender - discuss what is determined by biology versus society.
- Redefine your vocabulary - make sure your colleagues have a shared understanding of key terms. Many universities make glossaries available.
- Become aware of your own biases - hidden bias tests are useful tools for this.
- Removing gender terms and references - remove terms such as 'male', 'female', 'masculine', 'feminine', etc,
Resources for gender-inclusive teaching include:
- The Genderbread Person: a clear infographic that explains the differences between gender identity, gender expression, biological sex, and sexual orientation.
- Ask Anatomist - Episode 8: Genetics and the Spectrum of Sex Designations
- Redefining anatomical language in healthcare to create safer spaces for all genders
Other ways the Reproductive Physiology module has been designed to support learners to succeed
Making sure students are prepared for the lab
The labs and pre-lab preps focus on the testicular (prototypical male) reproductive system and the ovo-uterine (prototypical female) reproductive system. The two pre-lab preps have been created using our latest teaching template, which was designed to help better prepare students for success in the lab.
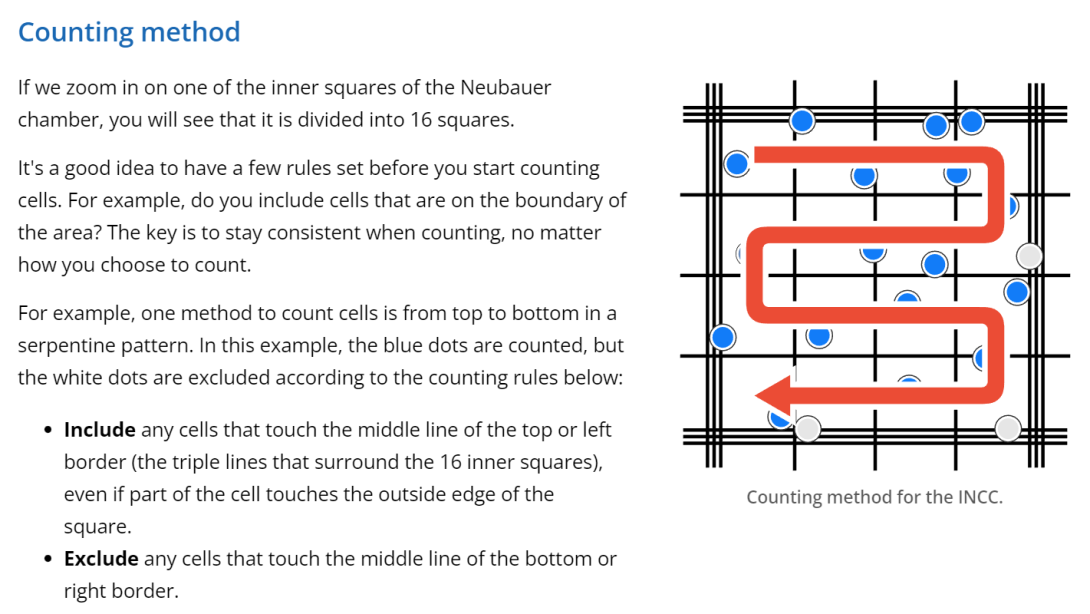
Not only do the pre-labs familiarize learners with the key concepts of the lab through a series of interactive questions, but they now include an introduction to the equipment and/or activities they will undertake, and provide opportunities to practice data analysis on example data, setting them (and you!) up for a streamlined lab experience.

Students become familiar with the counting method used with the Neubauer chamber.
Providing extra information for self-directed study or a curriculum boost
The three tutorials provide detailed background information on reproductive anatomy, reproductive physiology, and the menstrual cycle, which supports the associated labs and supplements learnings from the classroom. In these active learning tutorials, students learn how the reproductive anatomy develops at birth, how it matures and responds to puberty, and the mechanisms behind the monthly ovo-uterine cycle.
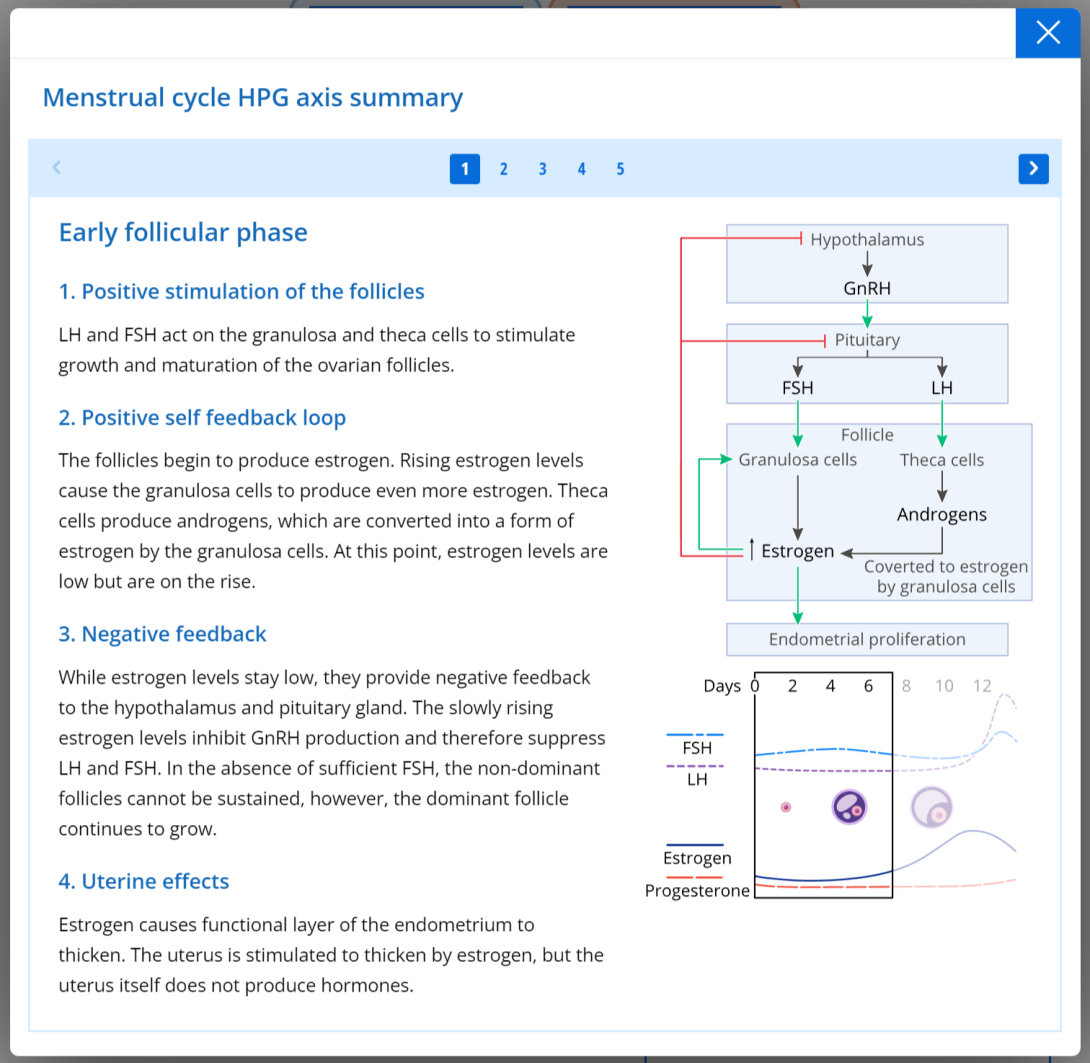
Each lesson is full of interactive questions and real-time feedback. Students can find the hypothalamus–pituitary–gonad (HPG) axis confusing, so we’ve made sure to address the axis for both systems in the Reproductive Physiology lesson. Students will also have access to this information on reproductive function in the labs and pre-lab preps.

Students can access detailed summary information on the HPG axis at any point within the labs, pre-lab preps, and Reproductive Physiology lesson.
While we encourage you to use the tutorials in a way that works for your classroom, the labs and pre-lab preps can be used with or without these extra lessons. Information is scaffolded so you can mix and match depending on your course structure, while making sure students are supported.
You might want to make these lessons available for students to use as self-directed study aids outside of class, or you might want to make them the basis of a workshop or lecture session.
Diving deeper into complex structures
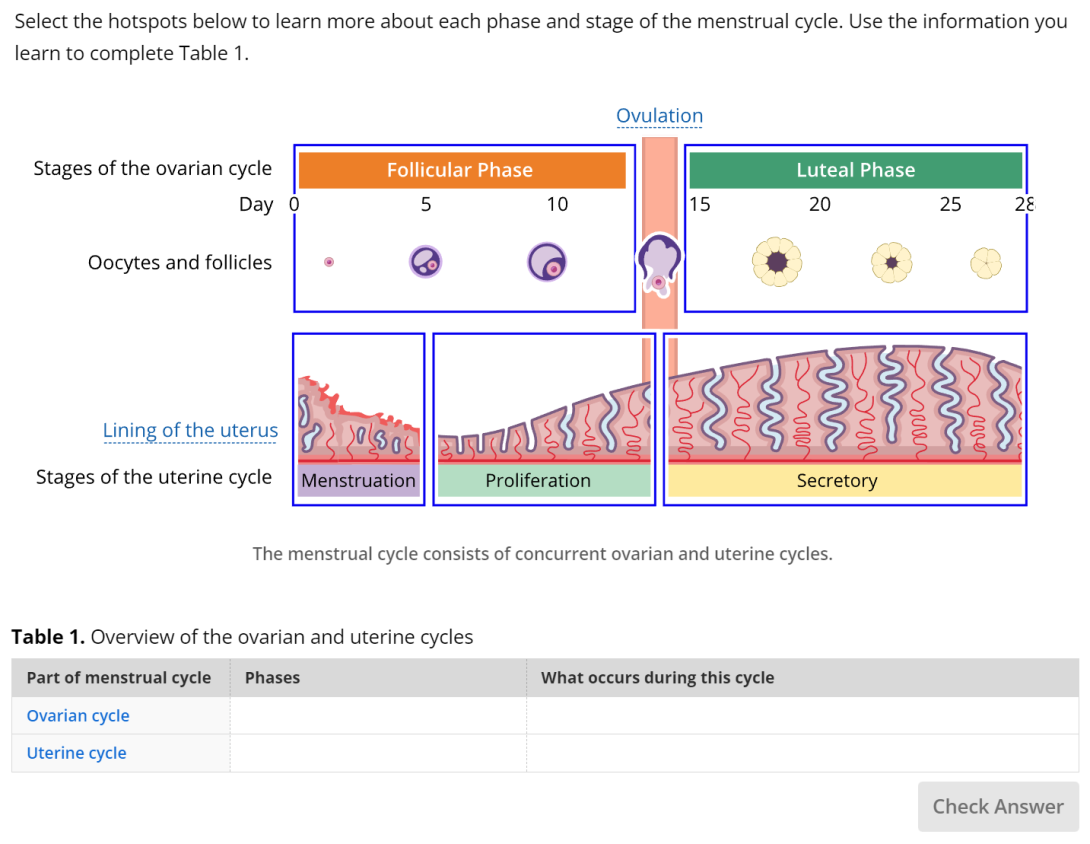
These labs feature our Hotspot panel, which is a perfect tool for walking learners through complex diagrams or graphs. When learners select a “hotspot” (highlighted region) on a diagram, it provides a short, written explanation of what they are seeing, and reinforces how the hormones, anatomy, and physiology all work together in the reproductive system.
Related: Learn more about the Hotspot panel + free anatomy images for download »
By presenting this written information in bite-size chunks, the Hotspot panel reduces cognitive load and allows students to explore at their own pace. Additionally, linking written and visual information helps students to “dual code” the material, which helps with recall and retention.
Related: Learn more about dual-coding and the importance of high-quality scientific images in education »
These interactive diagrams are paired with questions to ensure that students understand what they are looking at and grasp the key components. For example, students interact with the panel below to learn more about each phase and stage of the menstrual cycle, before using this information to complete a table question, summarizing their knowledge.

Highlighted regions and text in the Hotspot panel can be selected for additional information.
How can I access the module?
For those already using Lt, you can import any of the Reproductive Physiology module resources as part of the Lt Human Physiology Collection.
New to Lt? No worries! For those wanting to start using these lessons and labs immediately, you can sign up for our free trial!
Additional resources:
- New for physiology educators: Take a look inside our Reproductive Physiology Module...»
- New for physiology educators: Take a look inside our Hoffmann’s Reflex Lab… »
- New for physiology educators: Take a look inside our Endocrine Physiology Lab… »
- What’s it like to use Lt as a student? “Great fun…the hands-on side of it really accelerates the learning” »
