


With the advent of AI and image generators, it is easier than ever to find images to throw into text-heavy handouts or dense lecture slides. However, the quality of the images you use is just as important as the quality of the text.
Download 10 free high-quality physiology illustrations to help support your teaching.

Why use images in your teaching?
We’ve previously explored why imagery is such a powerful tool for learning. According to the literature, working memory is the main bottleneck for learning. Your students use their working memory to hold all of the necessary information to build a complete mental model of the concept being presented before the concept as a whole can be laid down in short-term or long-term memory.
We know that in order to learn most effectively, topics should be introduced one at a time, and new concepts should be introduced only after the previous concept is fully realized. Each piece of information, whether it is text or imagery, is a step toward realizing a complete mental model of the topic. It needs to be chosen carefully to support the information your students already have and not overwhelm them.
Imagery can be a great shortcut for building that mental model without adding too much load to your student's working memory. By breaking up dense text and providing supportive information, high-quality scientific images are an important tool in your arsenal. However, if you’re using ambiguous or poorly targeted images, you can throw this process off, adding irrelevant or even incorrect information to that mental model as it is being formed.

An Lt Physiology illustration of the knee-jerk reflex. One of ten free images available to download now.
How are high-quality images designed?
Scientific images need to be planned and created with intention and care in order to be effective learning tools. Jess, one of our Medical Illustrators for Lt, explains her process for developing a flow chart of the endocrine system:
If not well designed, flowcharts like the endocrine hormone flowchart can be overwhelming to look at and challenging to interpret. Images like these have a lot of information to convey to the viewer, so I like to ensure they can be 'read' easily. In designing this flowchart, I used a lot of the same principles that I use for creating all my images.
Firstly, I considered the layout or direction of flow that will make the image easiest to read. With flowcharts, I try to have the layout arranged such that no arrows will cross over each other unnecessarily. I also like to make sure all elements have ample space and don't look cramped, as this helps to reduce 'visual clutter', which can slow down or distract the viewer. This sometimes means changing the layout a few times until I can get everything fitting well and with logical flow!
To further improve clarity, I used symbols and color to clearly indicate stimulation or inhibition. Rather than relying solely on arrow direction or color, which can sometimes be ambiguous, I added "+" or "−" symbols next to arrows to explicitly show whether a process is excitatory or inhibitory. This ensures that the relationships between different endocrine signals are immediately clear to the viewer.
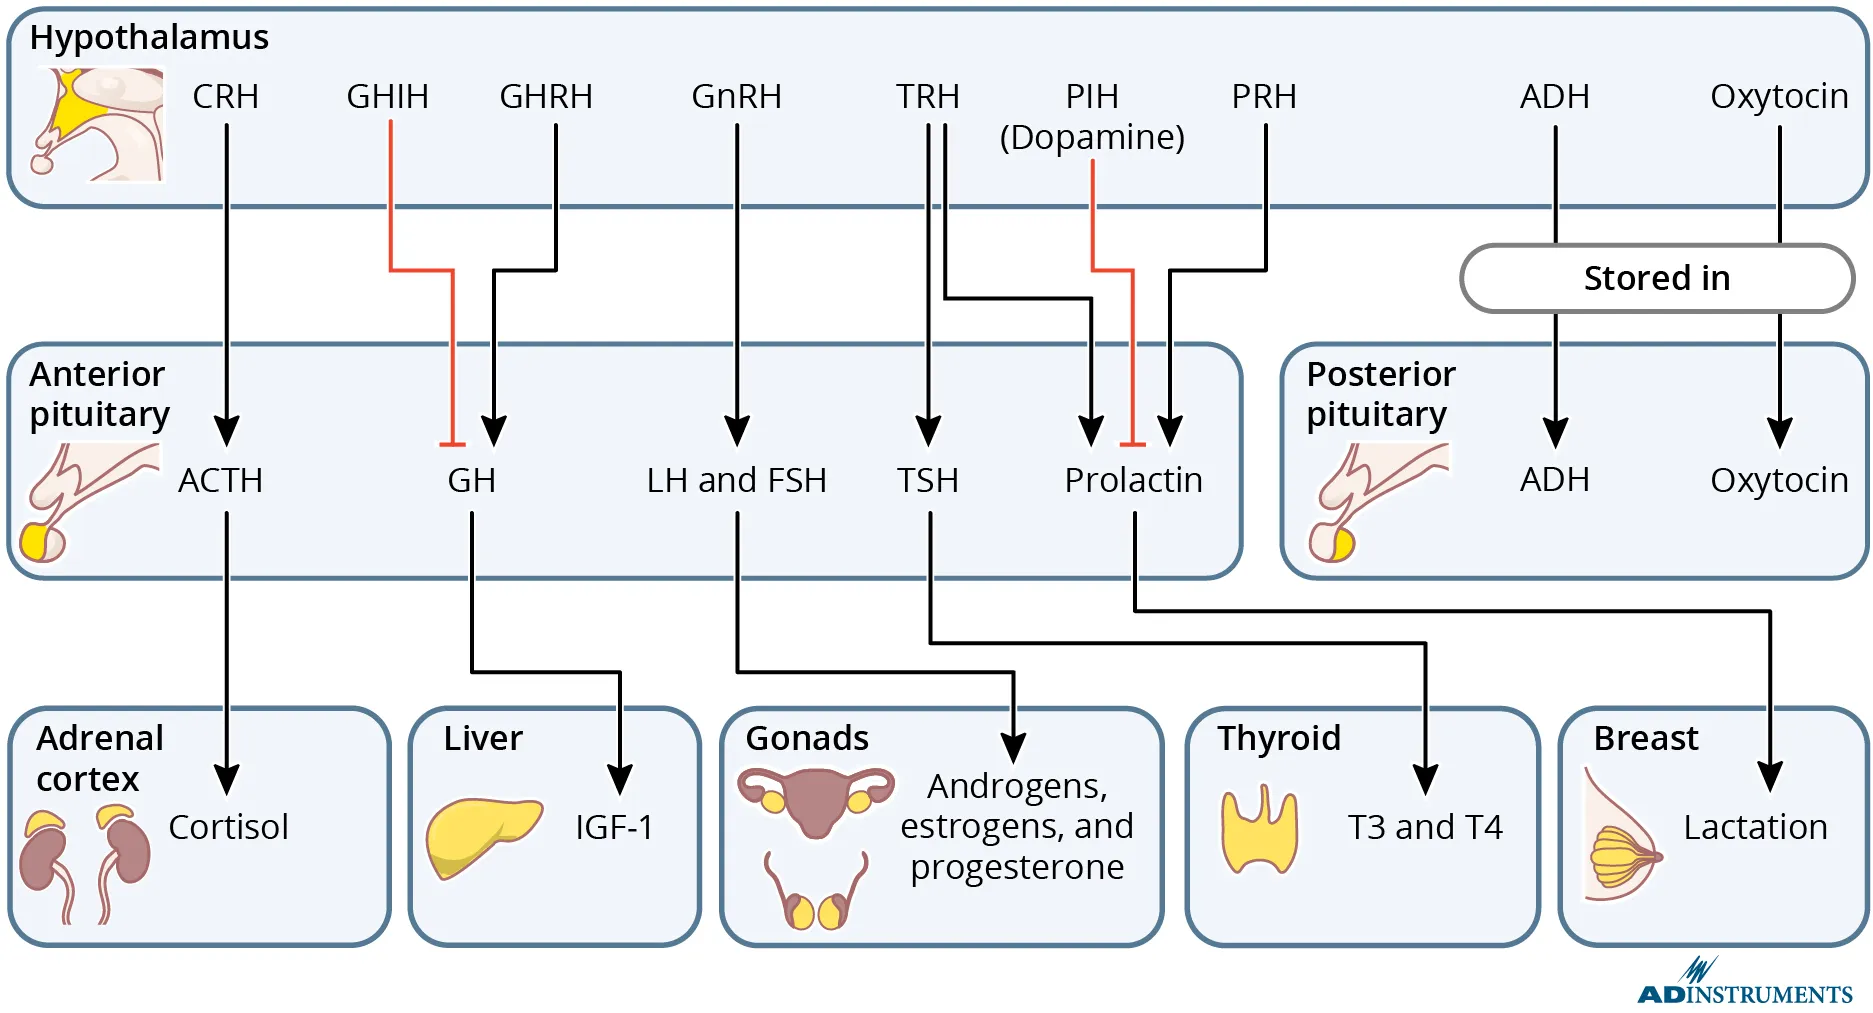
An Lt Physiology flowchart showing the inhibitory and excitatory impacts of the human endocrine system. One of ten free images available to download now.
Secondly, I made sure that every element in the image, including text, is of a large enough size to be most clearly visible. I use a font size of 17pt, as it is generally recommended that font size is 16pt or larger for accessibility.
Thirdly, I like to make sure viewers immediately know what they are looking at, as images should enhance the text and assist with learning, rather than be a puzzle to make sense of. In the endocrine hormone flowchart, there are multiple different parts of the body involved, so I have added small icons of the relevant organs involved so the viewer can more rapidly orient themselves than they can with text alone.
My final check of an image is to confirm that it is as color blind friendly as possible, and that all labels are well-contrasted against the background.
Learning Physiology with Lt
Lt not only provides a wide range of high-quality physiology images but also gives you the tools to make the most of them. Interactive features like Hotspot Panels, Pop-Ups, and Button Panels help you to guide your students' attention and support them throughout their learning experience.
Lt Physiology Collection
Lt’s Human Physiology Collection includes professionally designed lessons and labs, including ECG, Spirometry, and EMG. Combine it with Lt’s Anatomy Collection for a complete A&P course on a single delivery platform.
Click here to take a look inside the Physiology Collection.