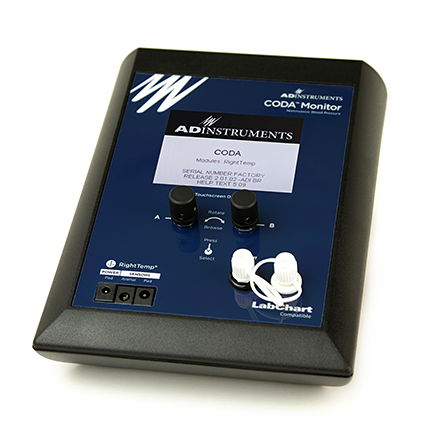
The Rodent NIBP CODA Monitor is designed to non-invasively collect volume pressure recordings (VPR) in rodents from 8 grams to 950 grams. The CODA Monitor’s specifically designed cuffs measure blood volume in the tail and provide data on systolic, diastolic, and mean blood pressures, as well as heart rate and temperature.
Here are a few ideas to help optimize your processes as you prepare for your first experiments with the monitor.
Setting up and testing your equipment
Before you begin introducing your animals to the equipment, ensure everything is working as expected. If it is not already installed, now is the time to install LabChart. Once LabChart is installed, connect the CODA monitor to your computer using the included USB attachment. This will install the CODA software.
Now is the time to determine the size of cuffs and animal holders you should use for each animal. If your animals will be awake during your experiment it is important to select a holder that is large enough to fit the animal, but not so large that it allows the animal to move around and disrupt measurements once the head cone is properly adjusted. The CODA NIBP Rodent Holder product page provides guidelines based on the weight of the animal.
The occlusion cuffs and VPR cuffs are intended to fit snugly, but not too tightly, on the tail of the animal. The occlusion cuff should fit at, or near, the base of the tail with the VPR cuff next to it. Before use, test the cuffs using the ‘CODA tests’ option on the CODA monitor to ensure there are no leaks.
Training and acclimatization
Stressors, including unfamiliar situations, will interfere with your results. To minimize the impact of these stressors it is crucial to acclimatize each animal to the procedure before recording any experimental data. This ensures that each animal feels secure. We recommend daily acclimatization for at least 7 days prior to experimentation.
Developing an acclimatization strategy for your lab will help to streamline the process, and ensure consistency across subjects.
When developing this strategy you should try to be consistent with:
- The time of day, or point in the light/dark cycle of the animal when it is being acclimated.
- Level of light in the room.
- Handling time prior to introduction to equipment.
And try to avoid:
- Staff changes for cage cleaning.
- Experimenter stress.
- Threatening scents from nearby rooms (e.g. rats in nearby rooms when working with mice).
- Cleaning the animal holder between uses, if possible. The holder will become less stressful as it begins to smell more like the animal.
- Other causes of stress to the animal.
Body and tail temperatures
In both anesthetized and awake animals, aim for a tail and core temperature of 37C. This ensures the most accurate readings, as lower temperatures will impact peripheral blood flow to the tail.
Anesthetized animals
Anesthetics can produce a hypothermia-like reduction in peripheral blood flow, which can be counteracted with heat. Place the animal directly onto the IR heat mat. Insert the animal sensor as a rectal probe to keep accurate measure of body temperature. On the CODA Monitor, select ‘homeothermic mode’ and adjust the onscreen temperature. The IR heat mat will automatically adjust its warming to keep the animal’s core temperature at your selected temperature.
For extra assurance; cover the torso and tail with the warming blanket for 5-10 minutes, and use the IR thermometer to measure tail temperature before beginning your experiment.
Awake animals
Secure both animal sensors to the warming pad, directly beneath the animal holder. Place the animal inside the holder and ensure it is secure. Select ‘warming pad mode’ on the CODA Monitor. This mode is less specific, because it lacks a direct core temperature reading. You will need to select a power percentage and adjust if necessary.
The tail should be outside of the animal holder and resting on the IR heat mat. Apply the cuffs and then cover the tail with the warming blanket for 10-15 minutes before testing with the IR thermometer. Adjust the power in ‘warming pad mode’ and repeat as necessary to get your desired temperature.
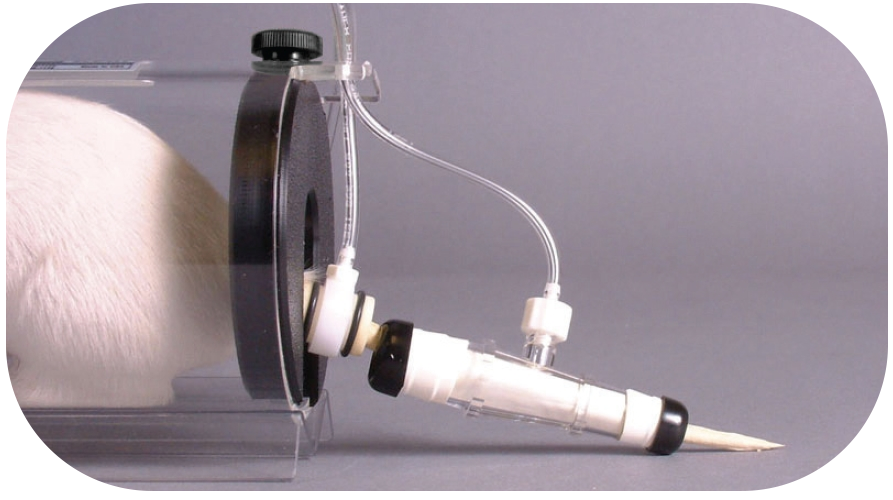
Positioning tail cuffs
Cuffs should slide easily onto the tail without being a tight fit, sliding free, or bending the tail. The occlusion cuff should be positioned first, sliding up near the base of the tail without using excess force. The VPR cuff should be placed next to it, again it shouldn’t be a tight fit. Make sure the tail doesn’t bend or kink when being fed through the cuff.
Simply slide the cuffs back off the tail after use. The white latex inserts will need to be replaced periodically, due to wear and tear, but you don’t need to worry about this until they fail an inflation test.
Watch our walk-through to set up the Coda Monitor here »
Related material
CODA® Monitor Quick Start Guide »
NIBP | Blood Pressure Measurement »
Related products