A step-by-step demonstration of how to calibrate a Force Transducer and apply a pre-tension for measuring isometric contractions in an isolated tissue study.
Equipment required
- Force Transducer
- Micropositioner + Stand
- 10g weight
- Bridge Amp
- PowerLab
- Computer with LabChart Software installed
Procedure
Equipment set-up
Before recording any signals, it’s important to set up your data acquisition equipment correctly.
- Attach the Force Transducer to the Micropositioner + Stand
- Connect the Force Transducer to the Bridge Amp
- Connect the Bridge Amp to the PowerLab
- Lastly, connect the PowerLab to your computer and open LabChart
Zeroing the transducer
The next thing you need to do is zero the force transducer.
- In LabChart, click on the channel name that the Bridge Amp is connected to and select ‘Bridge Amp’ from the drop-down menu.
- In the Bridge Amp Dialog make sure that the range is sufficient for the forces you will be recording. In this case, 10 mV will be fine.

Tip: Care must be taken when determining an appropriate range for your force transducer. If the range is too large, the resolution will be poor and small fluctuations will not be seen. Conversely, if the range is too small, the signal will go out of range and you will lose data. Most transducers (on 10 V excitation) have an output of ~ 5 mV/100 mmHg.
- Next, zero the transducer by clicking ‘Zero’. This will take a couple of seconds, make sure that the transducer is not moved during this period.
- Once that is done, click ‘OK’
Calibrating the transducer
Now that the transducer has been zeroed, you are ready to calibrate the transducer.
- First, start the recording in LabChart by clicking the ‘Start’ button
- Because the force transducer has just been zeroed, we know the current reading on-screen (in mV) is equivalent to 0 grams. Enter a comment labeled ‘0’ into LabChart to mark this section of the recording.
- Next, hang a small weight of known value onto the end of the transducer. In this example, we are going to use a 10-gram weight. Once on, add another comment to the recording labeled 10.
- Click ‘Stop’ to stop the recording
Units Conversion
- Make a selection of the recording between the two comments by clicking and dragging the mouse across the recording.
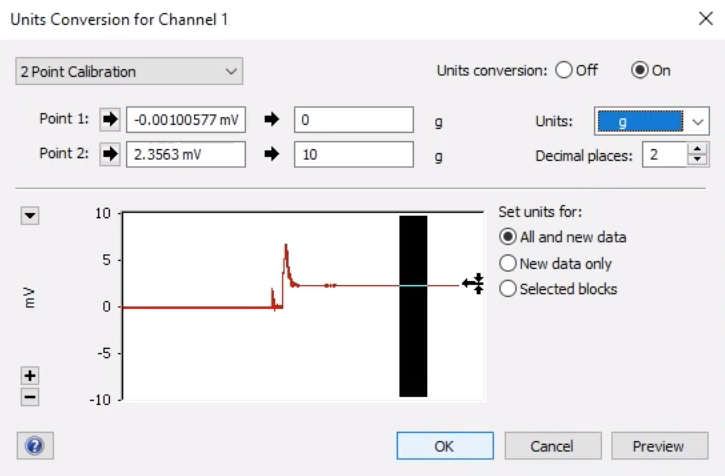
- Click on the Channel name and go to ‘Units Conversion. The Units Conversion Dialog will display the recording that was selected (see image below).
- Select an area of the recording that represents the first reading of 0 grams in the preview window.
- Then click the arrow next to Point 1 and the voltage for that reading will be entered into the left-hand box.
- Next, type in the value this selection represents in the right-hand box (in this case, 0).
- Repeat the above steps for the second reading of 10 grams, next to Point 2.
- Make sure the units are set as grams, then click ‘OK’.
- Now your force transducer is calibrated in grams

Applying a pre-tension
Another factor you might need to consider when doing a tissue contraction study is whether you need to apply a pre-tension to the tissue before making any recordings. The exact pre-tension (in grams) should be specified in the protocol.
To apply a pre-tension:
- Loosely hang the tissue on the transducer. One end of the tissue should be tied to the transducer and the other end to the tissue hook in the bath.
- Start the recording. The reading on-screen will have already increased slightly due to the added weight of the tissue on the end of the force transducer.
- Adjust the micropositioner by twisting the knob on top. This will slowly to lift the force transducer and increase the tension on the tissue.
- You can view the exact amount of tension that is being applied to the tissue in grams using the DVM readout in LabChart.
- Once the desired pre-tension has been reached, open the Bridge Amp Dialog and zero the transducer again by clicking the ‘Zero’ button.
- Once zeroed, click ‘OK’ to return to the recording.
- Now you are ready to begin your experiment!