This 12-lead ECG placement guide presents the placements of ECG leads for correct measurement of the heart's electrical activity.
Ensuring accurate ECG lead placement is pivotal for paramedics and EMTs, as it allows for the precise readings critical in cardiology. In pediatric patients, the importance of correct 12-lead electrode placement is heightened due to their smaller anatomy.
Incorrect placement can lead to inaccurate signal patterns and strengths. Proper lead placement ensures that the electrocardiogram captures a true representation of the heart's rhythm and is essential for accurate diagnosis and treatment planning.
How to do ECG
Capturing clear ECG/EKG signals is vital in gaining accurate insights and results.
Electrocardiography (ECG or EKG) detects the heart's electrical activity during myocardial contraction and relaxation, usually recorded by electrodes on the skin. ECG/EKG signals are recorded to examine heart rate, heart rate variability, analysis of the waveform morphology, arrhythmia, and other similar functions.
It can be a real challenge to record clean signals, especially when performing a 12 lead ECG. There are numerous elements to get right: the data recording equipment and limb leads need to be set up correctly, the subject needs to be comfortable, and you need to position the surface electrodes on the subject's torso and limbs precisely in order to get results that you can interpret accurately.
Related: What equipment do I need to record and analyze ECG/EKG data for research in human subjects?
Here is our simple guide for correctly placing surface electrodes when performing a 12 lead ECG:
Download our 12 lead ECG placement guide for quick reference
How to place ECG leads: Simple steps for correct 12 lead ECG placement
Prepare the skin
Before placing your ECG electrodes, it is very important to prepare the subject's skin by wiping the chest area thoroughly with skin cleansing (alcohol) swabs. This removes any oil that may be on the patient's skin and which can cause drift in your ECG/EKG signals.
Once the skin is clean, find and mark the placements for the electrodes...
Find and mark the correct lead placements for the 12 lead ECG

First, identify V1 and V2
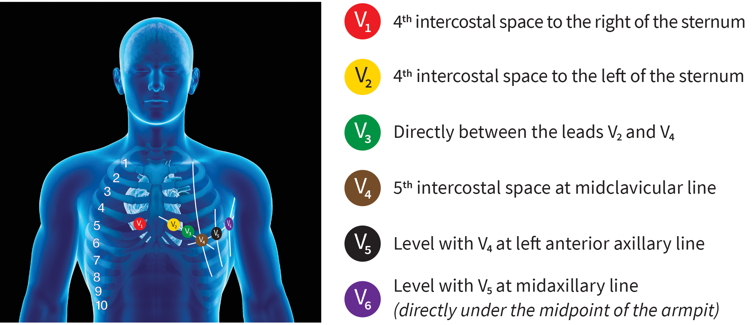
Find the correct lead placement for the chest leads, starting with V1 and V2.
It is especially important to correctly place V1 and V2 because the remaining chest leads are placed in relation to these.
To determine the placement of V1 and V2, feel to identify the top of your subject's sternum. Approximately 4 centimeters below this, there is a ridge. This identifies the second intercostal space. Feeling down, you will come across the third and fourth intercostal spaces. Use a skin-safe marker to mark the fourth intercostal space as V2.
Mark V1 in the mirror position on the opposite side of the chest.
Next, find and mark V3 - V6
You can do this by identifying V4 and V6, then filling in V3 and V5 as outlined below...
V4 can be found one intercostal space lower than V2, in line with the middle of the clavicle. Mark V4 with your skin safe marker.
Next, track along the torso to the subject's left to find V6 at mid auxiliary on the same horizontal level as V4. Mark V6.
V5 can be marked at midway between V4 and V6.
Likewise, mark V3 midway between V2 and V4.
You should now have 6 marks for V1 to V6.
Apply electrodes to the chest at V1 - V6
Apply your electrodes to your 6 marks!
Connect wires from V1 to V6 to the recording device
The 6 electrode wires can now be connected to your recording device. In this case, we are using ADInstruments' Octal Bio Amp and connect the wires to channels 1 through to 6.
Apply limb leads

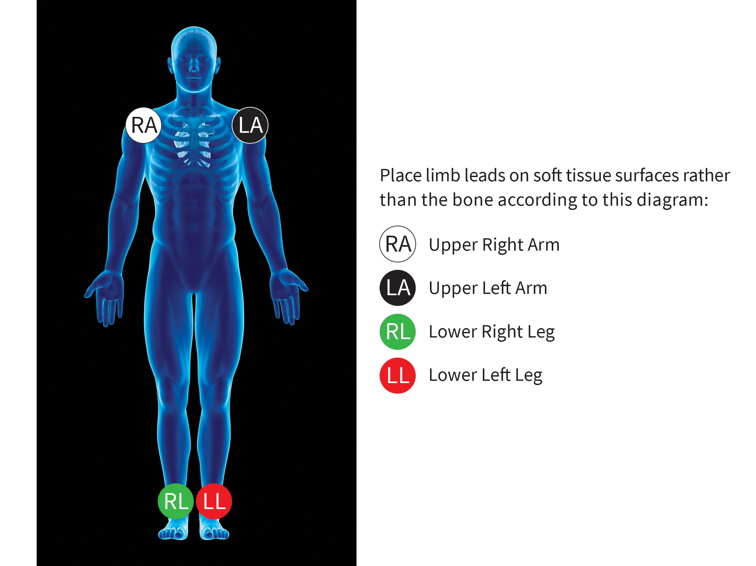
Apply lead 1 to the left arm. We suggest the front of the left shoulder in a place where there is little muscle or muscle movement, to avoid any EMG signal disturbance.
Next, apply lead 2 to the right arm. Again, the front of the shoulder is suggested here, in a place with little or no muscle or movement.
Then connect the left leg. Place the electrode slightly above the ankle. This electrode placement is the reference for all of the augmented leads.
Finally, apply the "common" on the right-hand side ankle. This connects to the ground input on your recording device (Octal Bio Amp).
Connect the limb leads to your recording device and test you are receiving a signal.
To see a short video and guide on the end to end process of setting up equipment and recording signals for a 12-lead ECG using the Octal Bio Amp and Cardiac Axis calculator from ADInstruments, please click through here.
Related: Equipment guide for ECG/EKG recording and analysis in human subjects
Download our 12 lead ECG placement guide
How can ADInstruments help with my ECG/EKG research?
ADInstruments offer a range of Bio Amps for recording ECG/EKG signals that are tested and certified for use in human subjects. Our Bio Amps interface seamlessly with PowerLab and LabChart forming a streamlined ECG/EKG acquisition and analysis system.
For ECG/EKG recording, our single, dual, and octal Bio Amps are tested to meet the standards for certified patient isolation.
Record and analyze your ECG/EKG data within a single, streamlined system. Bio Amps interface seamlessly with PowerLab for high-quality signal acquisition, with data flowing directly into LabChart for analysis, with specialized features and modules including the ECG Analysis Add-On and Heart Rate Variability Add-On designed for the analysis of signals from humans.
LabChart software is designed specifically for life science data and provides up to 32 channels for data display and analysis options that are powerful and easy to use. With auto-recognition of ADI and LabChart Compatible hardware, multi-window views, one-touch recording, simultaneous recording from multiple devices, specialized preconfigured settings, easy sharing options, and an interface that can be customized to show only the features you want to use.
All of our hardware recommended for human use is backed by the appropriate safety certification standards. More information on safety standards.